RHEL、Rocky、AlmaLinux に Nagios をインストールする方法
Nagios は、データセンターにいるかどうかに関係なく、すべてのマシン/ネットワーク を常に監視するためのより包括的な監視環境を提供する、優れたオープンソース監視ツールです。あなたの小さな研究室。
Nagios を使用すると、リモート ホストとそのサービスを 1 つのウィンドウでリモート監視できます。これはサーバーで何か問題が発生した場合に警告を表示し示すため、最終的には問題が発生する前に検出するのに役立ちます。これはダウンタイムとビジネス損失の削減に役立ちます。
最近、Nagiosは最新バージョンのNagios Core 4.4.9とNagios プラグイン 2.3.3の最新の安定版リリースを 2022 年 10 月 4 日にリリースしました。 。
この記事は、RHEL および CentOS Stream などの RHEL ベースのディストリビューション上のソース (tarball) から最新バージョンのNagios Core をインストールして構成する方法を簡単に説明することを目的としています。、Rocky Linux、AlmaLinux、およびFedora。
30 分以内にローカル マシンを監視できるようになります。高度なインストール手順はなく、今日のほとんどの Linux サーバーで100%動作する基本インストールのみです。
注意: ここで示すインストール手順は、RHEL 9.0 Linux ディストリビューションに基づいて書かれています。
Linux への Nagios Core および Nagios プラグインのインストール
これらの指示に正しく従うと、次の情報が得られます。
- Nagios とそのプラグインは、/usr/local/nagios ディレクトリにインストールされます。
- Nagios は、ローカル マシンのいくつかのサービス (ディスク使用量、CPU 負荷、現在のユーザー、合計プロセス<) を監視するように設定されます。など)
- Nagios Web インターフェースは http://localhost/nagios で利用可能になります。
ステップ 1: Apache および PHP パッケージをインストールする
Apache、PHP、および gcc、glibc、glibc-common などのいくつかのライブラリをインストールする必要があります。 、 およびGD ライブラリとその開発ライブラリは、 ソースとともに Nagios をインストールする前に実行してください。そのためには、yum パッケージ インストーラーを使用できます。
yum install -y httpd httpd-tools php gcc glibc glibc-common gd gd-devel make net-snmp

ステップ 2: Nagios ユーザーとグループを作成する
useradd コマンドとnagcmd グループ アカウントを使用して新しいnagios ユーザーを作成し、パスワードを設定します。
[root@tecmint]# useradd nagios
[root@tecmint]# groupadd nagcmd
次に、usermod コマンドを使用して、nagios ユーザーと apache ユーザーの両方を nagcmd グループに追加します。
[root@tecmint]# usermod -G nagcmd nagios
[root@tecmint]# usermod -G nagcmd apache
ステップ 3: Nagios コアと Nagios プラグインをダウンロードする
Nagios インストールと今後のすべてのダウンロード用のディレクトリを作成します。
[root@tecmint]# mkdir /root/nagios
[root@tecmint]# cd /root/nagios
次に、wget コマンドを使用して、最新の Nagios Core および Nagios Plugins パッケージをダウンロードします。
wget https://assets.nagios.com/downloads/nagioscore/releases/nagios-4.4.9.tar.gz
wget https://nagios-plugins.org/download/nagios-plugins-2.3.3.tar.gz

ステップ 4: Nagios コアと Nagios プラグインを抽出する
次のように tar コマンドを使用して、ダウンロードしたパッケージを抽出する必要があります。
tar -xf nagios-4.4.9.tar.gz
tar -xf nagios-plugins-2.3.3.tar.gz
これらの tarball を抽出すると、そのディレクトリに 2 つの新しいフォルダーが表示されます。
ls -l

total 13804
drwxrwxr-x 21 root root     4096 Nov 17 02:22 nagios-4.4.9
-rw-r--r--  1 root root 11339450 Nov 17 03:08 nagios-4.4.9.tar.gz
drwxr-xr-x 15 root root     4096 Mar 11  2020 nagios-plugins-2.3.3
-rw-r--r--  1 root root  2782610 Mar 11  2020 nagios-plugins-2.3.3.tar.gz
ステップ 5: Nagios Core のインストールと構成
さて、まずNagios コアを設定します。そのためにはNagiosディレクトリに移動し、すべてがうまくいけばconfigureファイルを実行する必要があります。出力が表示されます。最後はサンプル出力です。
cd nagios-4.4.9/
./configure --with-command-group=nagcmd

Creating sample config files in sample-config/ ...


*** Configuration summary for nagios 4.4.9 2022-11-16 ***:

 General Options:
 -------------------------
        Nagios executable:  nagios
        Nagios user/group:  nagios,nagios
       Command user/group:  nagios,nagcmd
             Event Broker:  yes
        Install ${prefix}:  /usr/local/nagios
    Install ${includedir}:  /usr/local/nagios/include/nagios
                Lock file:  /run/nagios.lock
   Check the result directory:  /usr/local/nagios/var/spool/checkresults
           Init directory:  /lib/systemd/system
  Apache conf.d directory:  /etc/httpd/conf.d
             Mail program:  /usr/bin/mail
                  Host OS:  linux-gnu
          IOBroker Method:  epoll

 Web Interface Options:
 ------------------------
                 HTML URL:  http://localhost/nagios/
                  CGI URL:  http://localhost/nagios/cgi-bin/
 Traceroute (used by WAP):


Review the options above for accuracy.  If they look okay,
type 'make all' to compile the main program and CGIs.
構成後、make all コマンドと make install コマンドを使用して、すべてのバイナリをコンパイルしインストールする必要があります。必要なライブラリがすべてマシンにインストールされ、次に進むことができます。
make all
make install
*** Main program, CGIs and HTML files installed ***

You can continue with installing Nagios as follows (type 'make'
without any arguments for a list of all possible options):

  make install-init
     - This installs the init script in /lib/systemd/system

  make install-commandmode
     - This installs and configures permissions on the
       directory for holding the external command file

  make install-config
     - This installs sample config files in /usr/local/nagios/etc

make[1]: Leaving directory '/root/nagios/nagios-4.4.9'
次のコマンドは、Nagios の初期化スクリプトをインストールします。
make install-init
Nagios をコマンドラインから動作させるにはコマンドモードをインストールする必要があります。
make install-commandmode
次に、サンプル Nagios ファイルをインストールし、次のコマンドを実行してください。
make install-config
/usr/bin/install -c -m 775 -o nagios -g nagios -d /usr/local/nagios/etc
/usr/bin/install -c -m 775 -o nagios -g nagios -d /usr/local/nagios/etc/objects
/usr/bin/install -c -b -m 664 -o nagios -g nagios sample-config/nagios.cfg /usr/local/nagios/etc/nagios.cfg
/usr/bin/install -c -b -m 664 -o nagios -g nagios sample-config/cgi.cfg /usr/local/nagios/etc/cgi.cfg
/usr/bin/install -c -b -m 660 -o nagios -g nagios sample-config/resource.cfg /usr/local/nagios/etc/resource.cfg
/usr/bin/install -c -b -m 664 -o nagios -g nagios sample-config/template-object/templates.cfg /usr/local/nagios/etc/objects/templates.cfg
/usr/bin/install -c -b -m 664 -o nagios -g nagios sample-config/template-object/commands.cfg /usr/local/nagios/etc/objects/commands.cfg
/usr/bin/install -c -b -m 664 -o nagios -g nagios sample-config/template-object/contacts.cfg /usr/local/nagios/etc/objects/contacts.cfg
/usr/bin/install -c -b -m 664 -o nagios -g nagios sample-config/template-object/timeperiods.cfg /usr/local/nagios/etc/objects/timeperiods.cfg
/usr/bin/install -c -b -m 664 -o nagios -g nagios sample-config/template-object/localhost.cfg /usr/local/nagios/etc/objects/localhost.cfg
/usr/bin/install -c -b -m 664 -o nagios -g nagios sample-config/template-object/windows.cfg /usr/local/nagios/etc/objects/windows.cfg
/usr/bin/install -c -b -m 664 -o nagios -g nagios sample-config/template-object/printer.cfg /usr/local/nagios/etc/objects/printer.cfg
/usr/bin/install -c -b -m 664 -o nagios -g nagios sample-config/template-object/switch.cfg /usr/local/nagios/etc/objects/switch.cfg

*** Config files installed ***

Remember, these are *SAMPLE* config files.  You'll need to read
the documentation for more information on how to actually define
services, hosts, etc. to fit your particular needs.
ステップ 6: Nagios 構成のカスタマイズ
選択したエディタで「contacts.cfg」 ファイルを開き、nagiosadmin 連絡先定義に関連付けられた電子メール アドレスを電子メール アラートを受信できるように設定します。
vi /usr/local/nagios/etc/objects/contacts.cfg
###############################################################################
#
CONTACTS
#
###############################################################################

Just one contact defined by default - the Nagios admin (that's you)
This contact definition inherits a lot of default values from the
'generic-contact' template which is defined elsewhere.

define contact {

    contact_name            nagiosadmin             ; Short name of user
    use                     generic-contact         ; Inherit default values from generic-contact template (defined above)
    alias                   Nagios Admin            ; Full name of user
    email                   [email  ; <<***** CHANGE THIS TO YOUR EMAIL ADDRESS ******
}
ステップ 7: Nagios の Web インターフェイスをインストールして構成する
バックエンドのすべての設定が完了しました。次は、次のコマンドを使用して Nagios の Web インターフェイスを設定します。以下のコマンドは Nagios の Web インターフェースを構成し、Web 管理者ユーザー「nagiosadmin 」が作成されます。
make install-webconf

このステップでは、「nagiosadmin 」のパスワードを作成します。このコマンドを実行した後、Nagios Web インターフェイスにログインするときにこのパスワードが使用されるため、パスワードを 2 回入力して覚えておいてください。
htpasswd -s -c /usr/local/nagios/etc/htpasswd.users nagiosadmin
New password:
Re-type new password:
Adding password for user nagiosadmin
新しい設定を有効にするには、Apache を再起動します。
systemctl restart httpd
ステップ 8: Nagios プラグインをコンパイルしてインストールする
そこに移動し、以下の指示に従って設定してインストールします。
cd /root/nagios
cd nagios-plugins-2.3.3
./configure --with-nagios-user=nagios --with-nagios-group=nagios
make
make install
ステップ 9: Nagios 設定ファイルを確認する
これでNagios の設定がすべて完了しました。次はそれを検証するため、次のコマンドを挿入してください。すべてが順調に進むと、次の出力のように表示されます。
/usr/local/nagios/bin/nagios -v /usr/local/nagios/etc/nagios.cfg
Nagios Core 4.4.9
Copyright (c) 2009-present Nagios Core Development Team and Community Contributors
Copyright (c) 1999-2009 Ethan Galstad
Last Modified: 2022-11-16
License: GPL

Website: https://www.nagios.org
Reading configuration data...
   Read main config file okay...
   Read object config files okay...

Running pre-flight check on configuration data...

Checking objects...
	Checked 8 services.
	Checked 1 hosts.
	Checked 1 host groups.
	Checked 0 service groups.
	Checked 1 contacts.
	Checked 1 contact groups.
	Checked 24 commands.
	Checked 5 time periods.
	Checked 0 host escalations.
	Checked 0 service escalations.
Checking for circular paths...
	Checked 1 hosts
	Checked 0 service dependencies
	Checked 0 host dependencies
	Checked 5 timeperiods
Checking global event handlers...
Checking obsessive compulsive processor commands...
Checking misc settings...

Total Warnings: 0
Total Errors:   0

Things look okay - No serious problems were detected during the pre-flight check
ステップ 10: Nagios サービスをシステム起動に追加する
再起動後も Nagios を動作させるには、systemctl コマンドを使用してシステム起動時に nagios と httpd を有効にする必要があります。
systemctl enable nagios
systemctl enable httpd
次に、Nagios を再起動して、新しい設定を有効にします。
systemctl restart nagios
ステップ 11: ファイアウォールで Nagios Web を許可する
Nagios Web インターフェイスにアクセスするには、次のコマンドを実行して Apache ポートを開く必要があります。
firewall-cmd --permanent --zone=public --add-service=http
firewall-cmd --permanent --zone=public --add-service=https
firewall-cmd --reload
ステップ 12: Nagios Web インターフェイスにログインする
Nagios が動作する準備ができました。ブラウザで「http://Your-server-IP-address/nagios」または「http://FQDN/nagios」を使用して開いてください。 「strong> 」を入力し、ユーザー名「nagiosadmin 」とパスワードを入力します。
Nagios Web ダッシュボード

ホストビュー
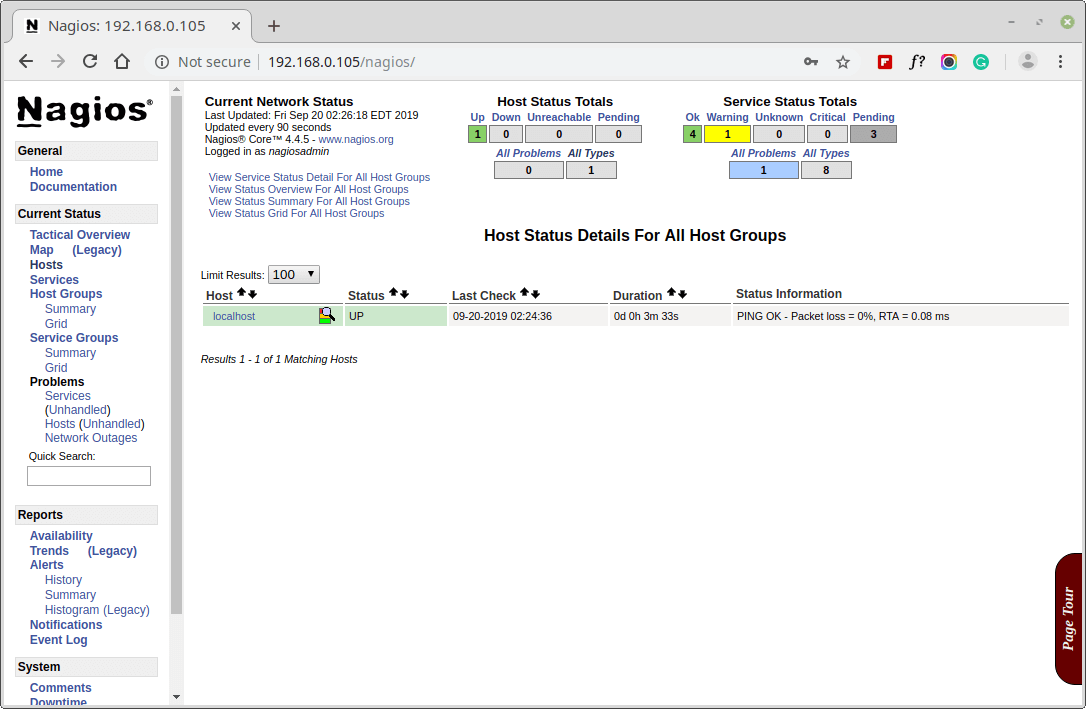
Nagiosの概要
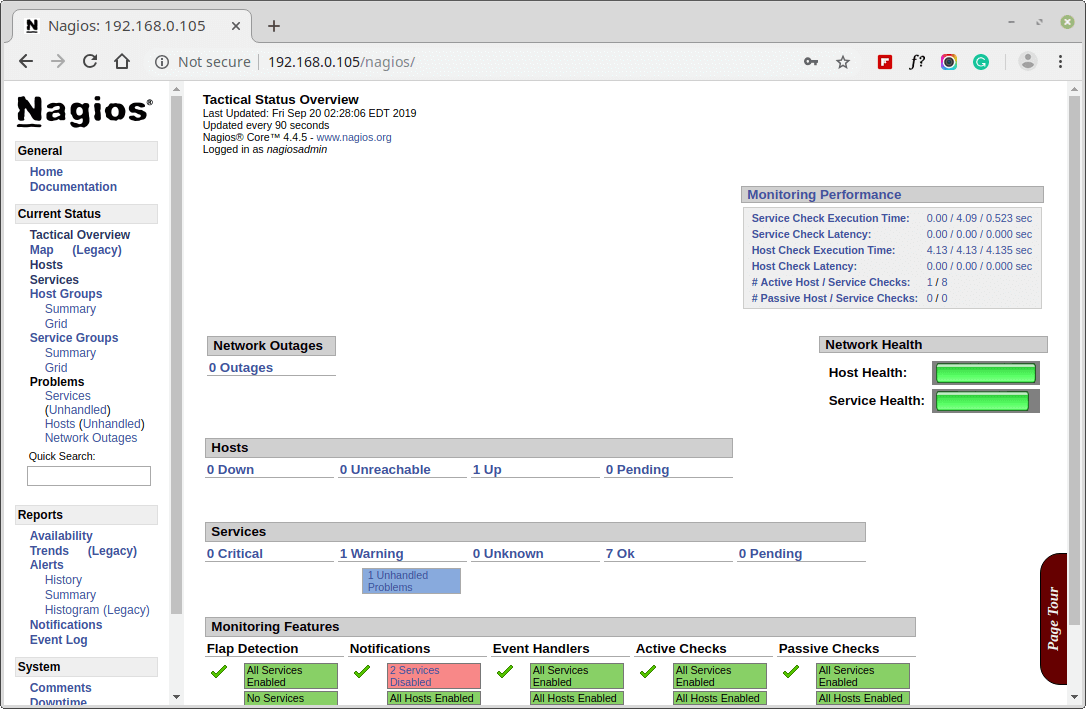
サービスビュー

プロセスビュー

おめでとう! Nagios とそのプラグインが正常にインストールされ、設定されました。モニタリングへの旅はまだ始まったばかりです。
Nagios 3.x から Nagios Core 4.x へのアップグレード
すでに Nagios の古いバージョンを実行している場合は、 いつでもアップグレードできます。そのためには、最新の nagios ソース tar アーカイブをダウンロードし、以下に示すように設定するだけです。
systemctl stop nagios
wget https://assets.nagios.com/downloads/nagioscore/releases/nagios-4.4.9.tar.gz
tar -zxvf nagios-4.4.9.tar.gz
cd nagios-4.4.9
./configure
make all
make install
systemctl start nagios
結論
今のところはここまでです。今後の記事では、Linux、Windows、プリンタ、スイッチ、< とデバイスを Nagios 監視サーバーに接続します。
インストール中に問題が発生した場合は、コメント経由でご連絡ください。それまではTecmint に注目してつながりを保ち、 周囲に広めるために「いいね!」 や共有 することを忘れないでください。
こちらもお読みください:
- Linux ホストを Nagios 監視サーバーに追加する方法
- Windows ホストを Nagios 監視サーバーに追加する方法